
Swatches
Update! Whisk supports Shopify's native swatches through product taxonomy as of version 9.0.0. We recommend you try to add swatches through this native way first if you are just getting started with swatches, as these swatches are the new standard across Shopify for any theme or store and the old method only supports up to 300 swatches.
How to add swatches to your store (new method as of Whisk v9.0.0)
1) Setup Shopify's product taxonomy and add swatches.
Here are some resources we have found with instructions on how to set these up.
This is Shopify's documentation on product taxonomy. There's a lot you can do with it beyond just setting up swatches: https://help.shopify.com/en/manual/products/details/product-category
This video tutorial is a great walkthrough to help you set these up. You only need the first 5:35 minutes and then move on to step 2.
2) Customize your swatches appearance in the theme editor
In the theme editor, go to Theme settings/Products where you will find these options.
Swatch shape
Choose the shape that you want your swatches to be. This will apply everywhere within the store that the swatches show and for all products. The options are: Circle, Square, Hexagon, or Diamond.
Product cards
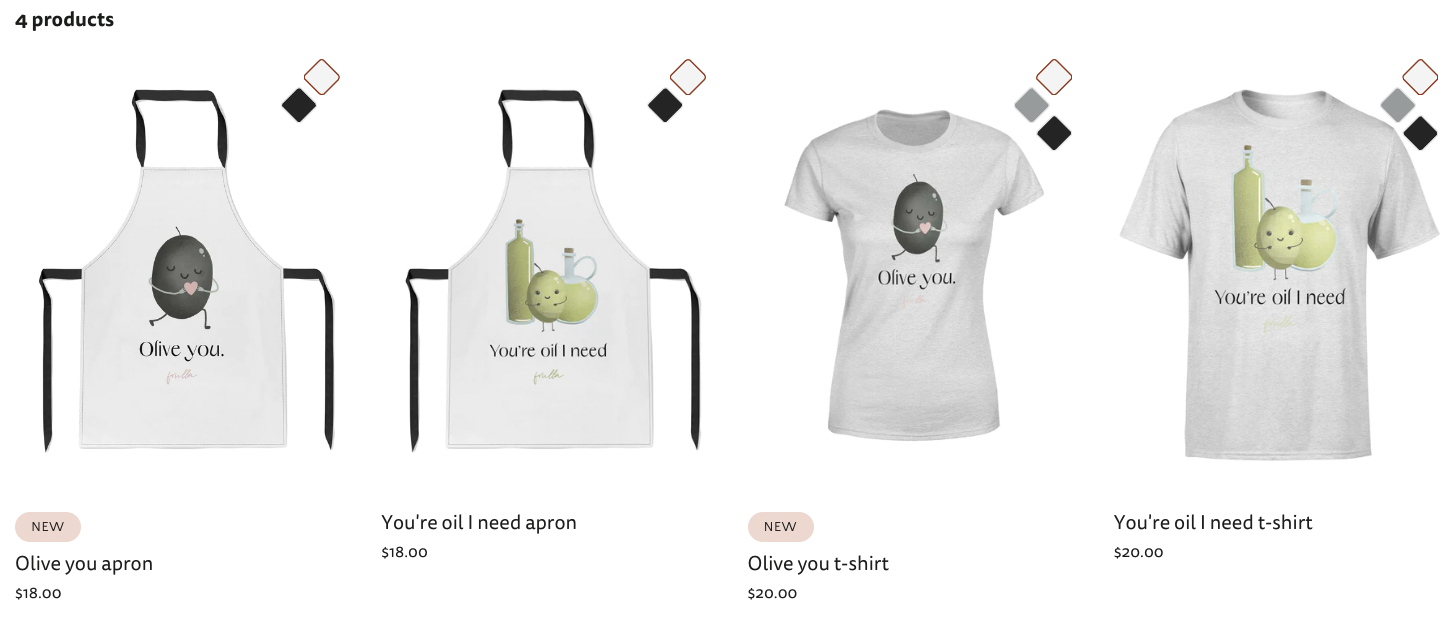
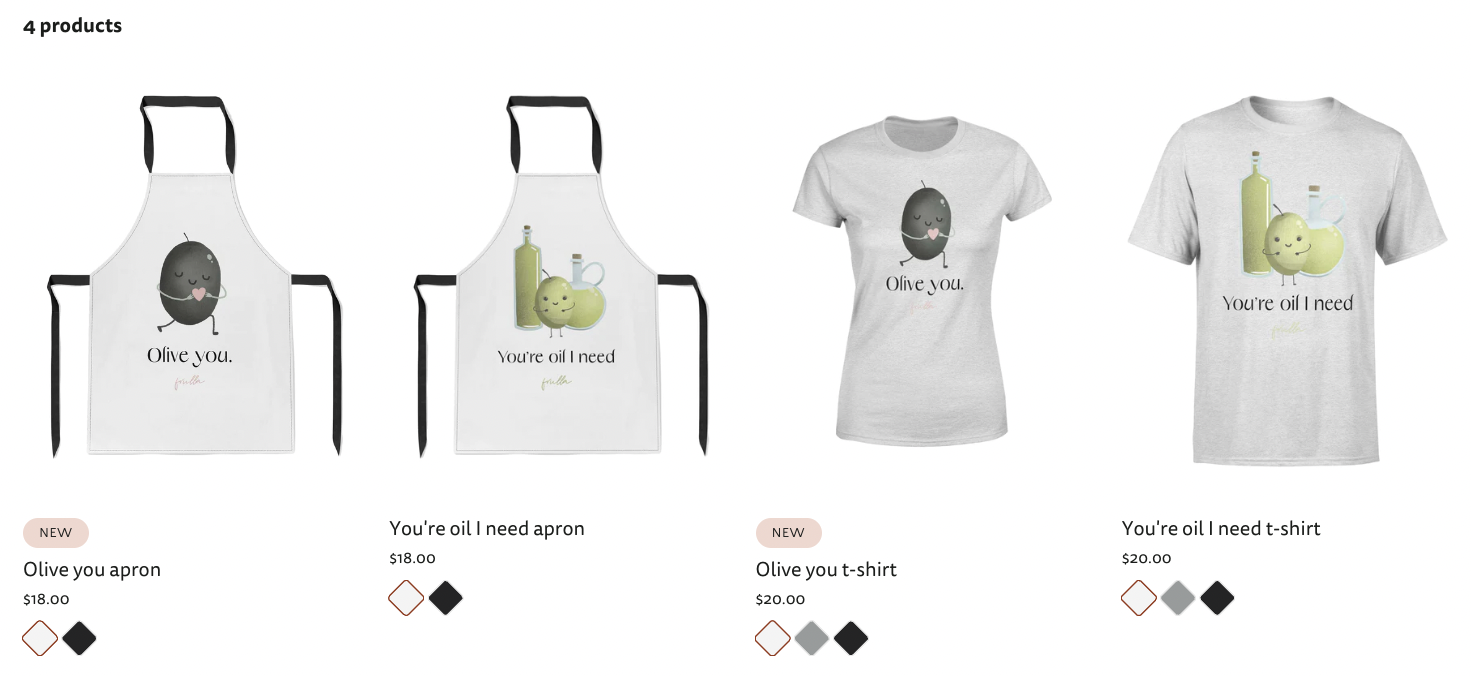
Show swatches on product cards
When this checkbox is checked, swatches will display on product cards throughout the store and each swatch is clickable to show the product variant image associated with that swatch. When more than one option contains swatches for a product, only one swatch set will show on the product cards, and it will be the first option that matches in the "Variant options for swatches" list.
Swatches placement on product cards
Choose whether to show the swatches on top of the product image, or below the product details.
How to add swatches to your store (old method)
1) Create a Swatch metaobject and add swatches to it
Navigate to Content/Metaobjects within the Shopify Admin. Click on the button that says "Add definition". If you already have other metaobjects, you'll find this as a link under the dropdown "All metaobjects". If this is your first metaobject, you should see a green button.

Fill out the form like it is below. The names need to match exactly in order for the swatches to work correctly in the Whisk theme. You'll add 3 fields to the object. Make sure to save the definitions when you are finished.
- Name: Swatches
- Field 1: Name - Single line text (required)
- Field 2: Swatches - Color (required)
- Field 3: Image - File. One file, image only

Add swatch entries by clicking into the link that appears after saving your metaobject called "start adding entries" or you can also "Add entry" from the main Metaobjects page.
-

Add the swatch information for each swatch you want to use on any and all products. Think of this as a master list of all the swatches available for your entire store. Only the swatches that are relevant to each product will show on the product. "Name" * & "Color" are required. "Image" is optional. If you want an image swatch, you should also declare a color as a fallback just in case the image doesn't load. The image will always take precedence and display first even if a color is also chosen. We recommend uploading images that are square, or a 1:1 ratio.

Save your swatch and repeat for all swatches you want on the store.


Add product variants with swatch names as option values by going to the product in the Shopify Admin.
-
Note: The "Name" needs to exactly match the name of the variant option value on the product that you want the swatch to display on. For example, the following swatch:


2) Enable swatches within the Whisk theme
In the theme editor, go to Theme Settings/Products. Scroll down until you see the "Variant picker" section. In this section you'll find a text field titled "Variant option for swatches". Here, you can enter the "Option name" for each option in your store that you want to display as swatches. "Color" is already enabled by default, but you can remove it, and add multiple options if you'd like. Each option needs to be separated by a comma.
Note: If you are using the Shopify Bundles app, you will need to also add the full name of the Option in the bundle here for it to convert to a swatch on the bundle product. This name is usually the product name with the original option name in parenthesis, for example, "Apron (Color)".
3) Customize your swatches appearance in the theme editor
In the theme editor, go to Theme settings/Products where you will find these options.
Swatch shape
Choose the shape that you want your swatches to be. This will apply everywhere within the store that the swatches show and for all products. The options are: Circle, Square, Hexagon, or Diamond.
Product cards
Show swatches on product cards
When this checkbox is checked, swatches will display on product cards throughout the store and each swatch is clickable to show the product variant image associated with that swatch. When more than one option contains swatches for a product, only one swatch set will show on the product cards, and it will be the first option that matches in the "Variant options for swatches" list.
Swatches placement on product cards
Choose whether to show the swatches on top of the product image, or below the product details.
-

Swatches on top of image
Here's a screencast that walks you through the old way for how to up swatches.